Posts

Semester Reflection

Image
Graphic Design Semester Reflection      So far this year, I have worked towards completion on one of my longest projects: a subscription box. Between designing patterns and deciding composition, it's only halfway done but it's still an impressive progress. The Takeaway      Each of the five guarantees played an important role in the learning process. With technology, I had to learn to design and create digital patterns, something I was not used to nor prepared for. I made my way through by asking questions and learning from mistakes. The composition of the box was also important lest it come out wrong. We only get one try with the boxes so it mattered greatly.      I continued working on collaborating and communication too. These were important to both understand the parameters of the project as well as catch hiccups along the way. By talking with fellow students and checking in with the teacher, I made sure to get things done cor...
Graphic Design Conclusion

Image
Favorite projects Color Font Pairing Typography      The typography assignment was one of the hardest projects this semester. We chose four quotes and arranged them digitally with specially picked fonts and colors (and graphics). I struggled with finding decent fonts that go together and go with my theme. I also had some difficulties choosing colors that complemented each other. However, I pulled through and learned a lot about both fonts and colors. My friend gave me some advice on what colors looked well together and what worked. My starting sketches were very basic and did not even factor in colors on most of them. In the end, I tinkered a lot with the design and got something I liked. I really liked this project because it helped me with choosing fonts, telling what colors go together, and arranging graphics/text. Original photo Vector Portrait      Not only did I get to look at my adorable cat's face all the time, but the vector portra...

Short Film

Pre Production      Our final project for video production has come to a close: the feature film. Tasked with creating a 5-8 minute long feature film, my group created Bases Loaded. We started out with everything planned, all props taken care of, the storyboard (by me) was coming along nicely, things were looking alright. Then, our two main actors had to cancel. The only people left that we could use were those in our own group, whose schedules were restricted to school hours. Our director Blake Gamber took the role of Jon and our planner Michael Lovelady played Matt. We ended up changing the story around to fit our new schedule. Luckily, production went a little better. Production      Majority of our film was shot at CBAC, the activity center right next to the school. We continued to get all the film we needed despite the poor weather and high winds. We got as many shots as we could for our multiple montages and got quite stable clips considering we...

The Breakfast Club Trailer

The Breakfast Club Trailer Parody Link Pre-Production      This time, we created movie trailers from actual trailers that existed. My group settled on the classic The Breakfast Club. (I had never watched it and had to go do that.) Before we started filming, we had to find our actors, divvy up roles, and dissect the trailer. I was the editor, Andrew Duwe was the director, and Blake Dane was our cinamatographer (and one of the actors). I made our shot sequence, which was the length of a clip, where it was, what happened in it, and what audio there was, for every different shot. Andrew and Blake divided up the story board (drawing pictures of each shot) 1:2. Lastly, Andrew was in charge of getting all of our actors. We even got our principal to be the principal in the video. Production      We did just about all of our filming in two days. After school Monday we filmed as many shots as possible with two of our actors, as Blake never showed up and did...

Vector Portrait

Image
Pre-production      The vector portrait has definitely been one of my favorite projects. The beginning was a little hard choosing what picture to use. It had to be a high resolution portrait of a person or animal. I ended up picking one of my favorite pictures of one of my cats: Buster. Unlike a lot of human portraits, the color-simplification in Photoshop was tough. Buster has a lot of detail in his fur so the program was unable to do a lot. It greatly simplified the background though, which helped me tune it out while working. Production      It is best to start on the eyes and nose in most portraits since they are often very detailed. The process of creating vectors and shapes around his eye was actually hypnotic and therapeutic. I ran into a little trouble with one of his eyes as he has some fog that harshly reflected the light. (Buster's not very old and we doubt it's a cataract but he has lost vision in that eye.) I improvised with some of the p...

High Hopes Music Video

Image
Panic! At the Disco - High Hopes Music Video Link Overview      The project we have been working on in Video Production was a music video. We had to pick a song that already exists and record and edit our own music video for it (using the original audio). My group chose High Hopes by Panic! At the Disco. Along the way we had to make a storyboard, a timeline, and a cast/location list. The Process      We had to record a ton of different scenes all over, including locations that we had to have a teacher come with us. We got the opportunity to work with brand new cameras on this project too. Unfortunately that made white balancing difficult and even the teacher had trouble so some of out shots came out blue and had to be adjusted in editing. Eventually we did get it working and still got some pretty good shots.      In editing, I laid all the clips in Premiere Pro (after clipping them and deleting the mistakes) and ...

Typography: B&W and Color

Image
Pre-Production Music B&W      I had a fun time looking for quotes but I was also a little finicky when it came to decided what I really liked. A number of the 10 quotes I saved were star-themed, the others were miscellaneous. Once I chose the first few quotes I wanted to use I knew what feel and idea I wanted to go for but finding a font to match was difficult. After perusing for a while, I eventually found several different fonts that I liked, ranging from serif to semi-bold blocks to script. I repeated a couple fonts that I enjoyed. Production      Creating in Illustrator was challenging, trying to arrange all the words and mix and match different fonts together. I was constantly resizing and moving words and phrases around, especially on the longer quotes. In some, I went for a centrally-aligned feel on a few quotes while many staggered about the screen depending on the words and idea I was trying to convey.  Music w/ Color ...

Graphic Design Performance

Image
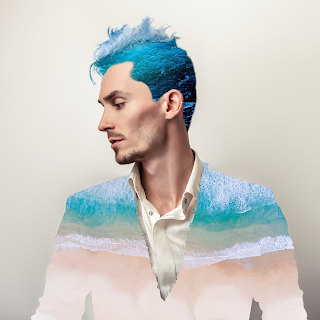
     Over the last semester, we have completed so many projects and learned a lot. From Nature Man to Infographics, we learned of diverse techniques, styles, and programs. As a review and reflection, it's always good to look back on your work and try to improve. I'm going to revisit a few of my favorites. Past Projects Nature Man      Nature Man was one of the first projects we did, aside from practice lessons. We were tasked with taking a profile picture of a man and editing it to a theme of our choosing. We worked on it for about a week or two, taking our time but also multitasking with other things. It was definitely hard starting out with only rusty knowledge from the previous year and the small lessons we had to complete, but still it remains one of my favorites. One of the hardest parts with this one in particular was the hair. Detailing every last strand to be live the waves was hard and taxing. Still, it payed off in the end by creating almost...

Panorama

Image
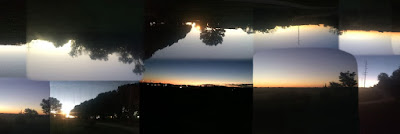
     The panorama was definitely a challenge. Blending nine photos not only into each other, but to fill the entire canvas. My theme was Golden Hour, or sunrise. Every morning since I started attending high school, I ride my bus while the world wakes up. It varies depending on the time of year, but there is a good portion of time where I get to witness the sunrise for almost my entire bus ride. The Experience      At first, it was strange and foreign to me. I had always lived right next to my schools so getting up at six in the morning was a new experience. Then (especially in winter) it would still be very dark when I left the house for my stop. In early fall/late spring, the sky starts to brighten at this time. For majority of the year, the sun rises at some point along my 45-minute ride. Sometimes, it stays dark for a long time and everything feels quiet and calm.      The particular day I took the images, I was blessed with the f...

Video Reflection

     In Video Production for the past few weeks, we have been hard at work finishing up our Sophomore Edition of ONW NOW (our schools weekly 10 minute news show). Even before that, we have done videos such as a feature story on a classmate, and then one on something of our choosing. Overall, while some things were a challenge, it was mostly enjoyable. I got to interview many interesting people, talk about cool stories, and work with fun people.      I learned a lot and I am starting to get more comfortable working with the equipment and interviewing people. Adobe Premiere Pro is getting easier to use and I'm learning all sorts of tips and tricks. I probably could have done better on some things, but that's all in the process of learning. Improvements      I could probably improve in areas such as my editing, speed, and productivity. It's always the little things that trip me up in editing, tiny little mistakes here and there. I just need...

Watercolor Transfer Printing Process

Image
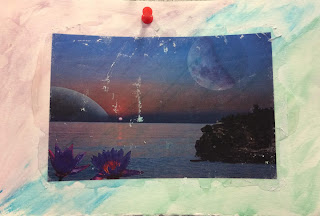
     On the side we began applying the printing processes to a small project: watercolor transfer. We printed off a picture of a recent project of our choice, either in color or black & white. We also used water colors to paint a small sheet of thick paper with any design we desired. We coated the paper (once it dried) with mod podge, a white glue-like substance that dries clear. Applying the print to the mod podge, we used a squeegee to flatten out any bubbles. Once that dried, we used water to gently rub off the paper until we could clearly see the image. The Step-by-Step      In case you are interested in doing this, here is a more in-depth look at what we did. Print off the picture of your choosing backwards (reflected across y-axis). You can also do multiple in case some don't turn out well or you have trouble deciding. Use a paint-friendly piece of paper with a sizable margin around where the print will go. You don't want it to reach the...

Printing Processes

Image
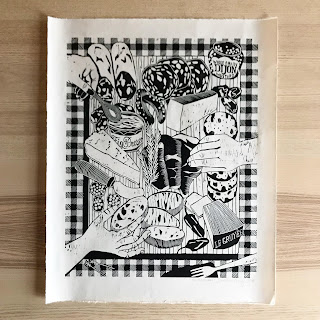
     We reviewed three different ways of printing: ink relief, intaglio, and lithography. They each share characteristics but have many different requirements, steps, and even tools. With different applications, resources, and finished products, each one is important. Ink Relief      Forms of ink relief was first used before the press was invented, so it could all be done by hand. With wood cut, the grain is important for the impressions it leaves in the black areas, while with the linoleum cut the black area is full and unbroken. In both cases, a previously drawn image can be traced or the image can be directly drawn onto the surface. Similar carving tools are used to define the white areas of the image, while places left alone are the black areas. Most styles are either white marks in a black area or small black streaks left in a white area. Many pictures use both is tandem. Once the image is complete, the object is treated properly then ink is applie...

Pop Art

Image
     One of the more recent tasks we tried was emulating pop art. We looked at many pop art pictures first, several distinct creators, and their personal styles. Afterwards we partnered up and took pictures of each other, using them for the pop art. Creating pop art digitally was definitely a challenge for me. How Did I Go About It?      I wanted a very vibrant theme but I generally stuck to cool colors in the beginning. I tinkered a lot with the specific colors themselves but it was difficult to get a coherent product I liked. I was very meticulous in where the colors went and how they bound to the edges. The shapes in the background were a lot more fun to create than spending forever adjusting and fixing the overlays. What Was My Style?      I quite liked the comic book-esc appearance of Roy Lichtenstein but had difficulty recreating the black outlines and edges. I settled for something a little closer to Andy Warhol's style of givi...

Back to the Basics

Image
     One of the things we had to do before we got too deep into any projects was review the basics and also new tools we were not familiar with. This included the Patch Tool, the Clone and Stamp Tools, the Healing Brush, and Content Aware Fill. Once we reviewed these thing we practiced applying them with little photos and a collage. What Did I Do?      I completed each practice image with the help of the tutorial and familiarized myself with the tool in question. Some were very similar. Content Aware Fill would use an algorithm to determine what should logically be in the gap selected. This is handy when you need to clean up something in an image like a wall backdrop with lots of dirty spots.      Cloning was manual for situations that the computer could not determine what looks right (which is often). Cloning is essentially as the name suggests, where you select a model area and stamp it into other places.      The Pat...

Nature Man

Image
Collage Challenge      In e-Comm, we recently embarked on our first challenge of the year. We were given a base photo of a man, and tasked with making a collage out of it. We were given creative freedom with what we could do and what pictures we could use. What Did I Do?      At first, I was not sure where to begin. I personally am drawn to the ocean, so I figured I would do aquatic themes. I found non-copyrighted photos of beaches and waves and chose which ones I liked. From there, I decided to make the man's jacket into a beach and his hair into the waves. It was interesting getting everything to fit. How Did I Do It?      I started with the jacket, as that was a much easier thing to do. Using a clipping mask, I made the beach into the jacket with the ebbing waves just beneath his shoulders. Manipulating the light curves, I got both the jacket and the background to reasonable colors.      Next, I tackled his hair...

e9 Final Exam

Image
     This quarter, we began on a big project that would last us until finals. We were put in teams of four and tasked with coming up with a product that does not exist, then to market it every way we have worked with in the past. Logos, websites, ads, coupons, commercials, you name it. It was sort of challenging coming up with everything, but we were led through rotations that helped a lot.      One challenge was the commercial, as the effects needed were really hard to get ahold of and perfect. The lightning bolt in the commercial had to be meticulously animated. We weren't given a whole lot of feedback until everything was practically finished and all the groups were getting ready to present their products. About half way through, we figured out a really cool slogan and started using it in more places. I am really proud of what my group created, and I feel we were tough competition, especially since another group in a different hour had an almost identi...